The finafit package brings together the day-to-day functions we use to generate final results tables and plots when modelling. I spent many years repeatedly manually copying results from R analyses and built these functions to automate our standard healthcare data workflow. It is particularly useful when undertaking a large study involving multiple different regression analyses. When combined with RMarkdown, the reporting becomes entirely automated. Its design follows Hadley Wickham’s tidy tool manifesto.
Installation and Documentation
The full documentation is now here: finalfit.org
The code lives on GitHub.
You can install finalfit from CRAN with:
install.packages("finalfit")
It is recommended that this package is used together with dplyr, which is a dependent.
Some of the functions require rstan and boot. These have been left as Suggests rather than Depends to avoid unnecessary installation. If needed, they can be installed in the normal way:
install.packages("rstan")
install.packages("boot")
To install off-line (or in a Safe Haven), download the zip file and use devtools::install_local().
Main Features
1. Summarise variables/factors by a categorical variable
summary_factorlist() is a wrapper used to aggregate any number of explanatory variables by a single variable of interest. This is often “Table 1” of a published study. When categorical, the variable of interest can have a maximum of five levels. It uses Hmisc::summary.formula().
library(finalfit)
library(dplyr)

# Load example dataset, modified version of survival::colon
data(colon_s)

# Table 1 - Patient demographics by variable of interest ----
explanatory = c("age", "age.factor",
  "sex.factor", "obstruct.factor")
dependent = "perfor.factor" # Bowel perforation
colon_s %>%
  summary_factorlist(dependent, explanatory,
  p=TRUE, add_dependent_label=TRUE)
See other options relating to inclusion of missing data, mean vs. median for continuous variables, column vs. row proportions, include a total column etc.
summary_factorlist() is also commonly used to summarise any number of variables by an outcome variable (say dead yes/no).
# Table 2 - 5 yr mortality ----
explanatory = c("age.factor",
  "sex.factor",
  "obstruct.factor")
dependent = 'mort_5yr'
colon_s %>%
  summary_factorlist(dependent, explanatory,
  p=TRUE, add_dependent_label=TRUE)
Tables can be knitted to PDF, Word or html documents. We do this in RStudio from a .Rmd document. Example chunk:
```{r, echo = FALSE, results='asis'}
knitr::kable(example_table, row.names=FALSE,
    align=c("l", "l", "r", "r", "r", "r"))
```
2. Summarise regression model results in final table format
The second main feature is the ability to create final tables for linear (lm()), logistic (glm()), hierarchical logistic (lme4::glmer()) and
Cox proportional hazards (survival::coxph()) regression models.
The finalfit() “all-in-one” function takes a single dependent variable with a vector of explanatory variable names (continuous or categorical variables) to produce a final table for publication including summary statistics, univariable and multivariable regression analyses. The first columns are those produced by summary_factorist(). The appropriate regression model is chosen on the basis of the dependent variable type and other arguments passed.
Logistic regression: glm()
Of the form: glm(depdendent ~ explanatory, family="binomial")
explanatory = c("age.factor", "sex.factor",
  "obstruct.factor", "perfor.factor")
dependent = 'mort_5yr'
colon_s %>%
  finalfit(dependent, explanatory)
Logistic regression with reduced model: glm()
Where a multivariable model contains a subset of the variables included specified in the full univariable set, this can be specified.
explanatory = c("age.factor", "sex.factor",
  "obstruct.factor", "perfor.factor")
explanatory_multi = c("age.factor",
  "obstruct.factor")
dependent = 'mort_5yr'
colon_s %>%
  finalfit(dependent, explanatory,
  explanatory_multi)
Mixed effects logistic regression: lme4::glmer()
Of the form: lme4::glmer(dependent ~ explanatory + (1 | random_effect), family="binomial")
Hierarchical/mixed effects/multilevel logistic regression models can be specified using the argument random_effect. At the moment it is just set up for random intercepts (i.e. (1 | random_effect), but in the future I’ll adjust this to accommodate random gradients if needed (i.e. (variable1 | variable2).
explanatory = c("age.factor", "sex.factor",
  "obstruct.factor", "perfor.factor")
explanatory_multi = c("age.factor", "obstruct.factor")
random_effect = "hospital"
dependent = 'mort_5yr'
colon_s %>%
  finalfit(dependent, explanatory,
  explanatory_multi, random_effect)
Cox proportional hazards: survival::coxph()
Of the form: survival::coxph(dependent ~ explanatory)
explanatory = c("age.factor", "sex.factor",
"obstruct.factor", "perfor.factor")
dependent = "Surv(time, status)"
colon_s %>%
  finalfit(dependent, explanatory)
Add common model metrics to output
metrics=TRUE provides common model metrics. The output is a list of two dataframes. Note chunk specification for output below.
explanatory = c("age.factor", "sex.factor",
  "obstruct.factor", "perfor.factor")
dependent = 'mort_5yr'
colon_s %>%
  finalfit(dependent, explanatory,
  metrics=TRUE)
```{r, echo=FALSE, results="asis"}
knitr::kable(table7[[1]], row.names=FALSE, align=c("l", "l", "r", "r", "r"))
knitr::kable(table7[[2]], row.names=FALSE)
```
Rather than going all-in-one, any number of subset models can be manually added on to a summary_factorlist() table using finalfit_merge(). This is particularly useful when models take a long-time to run or are complicated.
Note the requirement for fit_id=TRUE in summary_factorlist(). fit2df extracts, condenses, and add metrics to supported models.
explanatory = c("age.factor", "sex.factor",
  "obstruct.factor", "perfor.factor")
explanatory_multi = c("age.factor", "obstruct.factor")
random_effect = "hospital"
dependent = 'mort_5yr'

# Separate tables
colon_s %>%
  summary_factorlist(dependent,
  explanatory, fit_id=TRUE) -> example.summary

colon_s %>%
  glmuni(dependent, explanatory) %>%
  fit2df(estimate_suffix=" (univariable)") -> example.univariable

colon_s %>%
  glmmulti(dependent, explanatory) %>%
  fit2df(estimate_suffix=" (multivariable)") -> example.multivariable

colon_s %>%
  glmmixed(dependent, explanatory, random_effect) %>%
  fit2df(estimate_suffix=" (multilevel)") -> example.multilevel

# Pipe together
example.summary %>%
  finalfit_merge(example.univariable) %>%
  finalfit_merge(example.multivariable) %>%
  finalfit_merge(example.multilevel) %>%
  select(-c(fit_id, index)) %>% # remove unnecessary columns
  dependent_label(colon_s, dependent, prefix="") # place dependent variable label
Bayesian logistic regression: with `stan`
Our own particular rstan models are supported and will be documented in the future. Broadly, if you are running (hierarchical) logistic regression models in Stan with coefficients specified as a vector labelled beta, then fit2df() will work directly on the stanfit object in a similar manner to if it was a glm or glmerMod object.
3. Summarise regression model results in plot
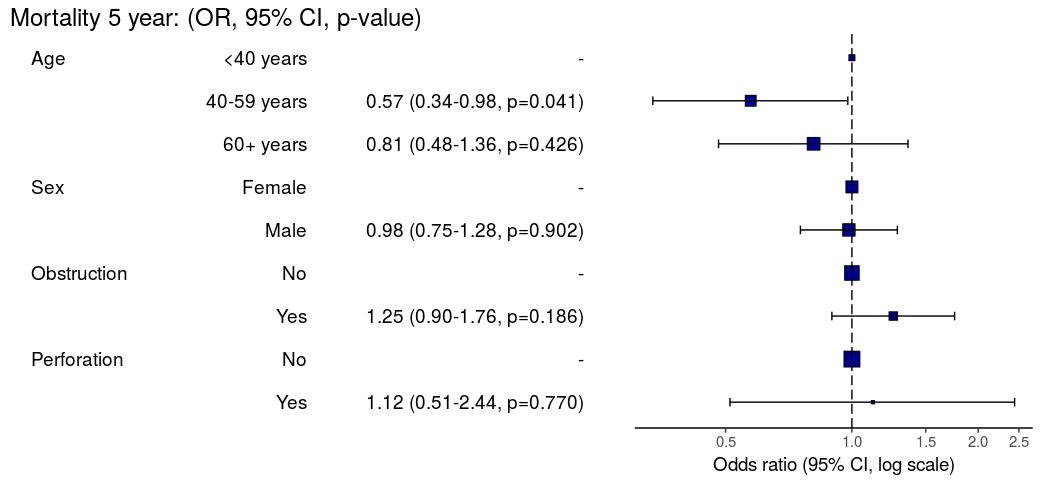
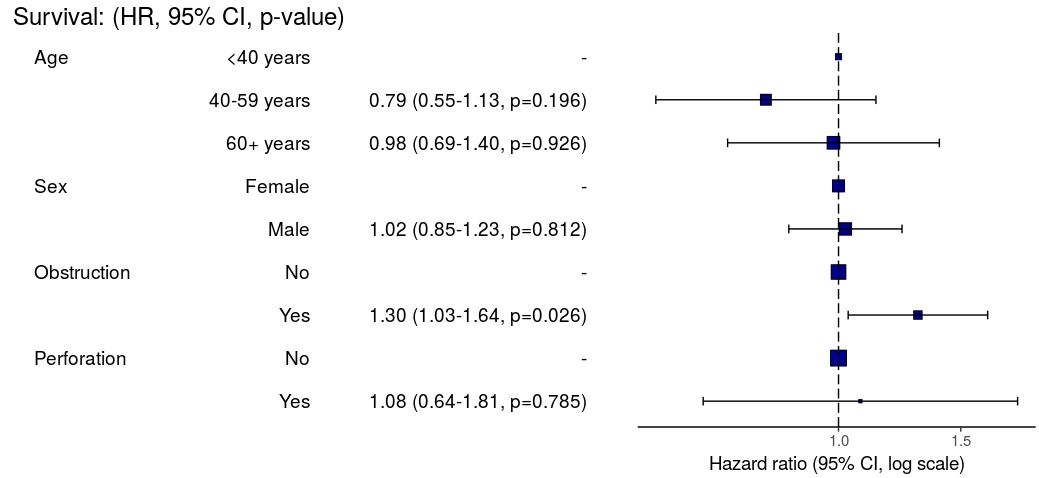
Models can be summarized with odds ratio/hazard ratio plots using or_plot, hr_plot and surv_plot.
OR plot
# OR plot
explanatory = c("age.factor", "sex.factor",
  "obstruct.factor", "perfor.factor")
dependent = 'mort_5yr'
colon_s %>%
  or_plot(dependent, explanatory)
# Previously fitted models (`glmmulti()` or
# `glmmixed()`) can be provided directly to `glmfit`
HR plot
# HR plot
explanatory = c("age.factor", "sex.factor",
  "obstruct.factor", "perfor.factor")
dependent = "Surv(time, status)"
colon_s %>%
  hr_plot(dependent, explanatory, dependent_label = "Survival")
# Previously fitted models (`coxphmulti`) can be provided directly using `coxfit`
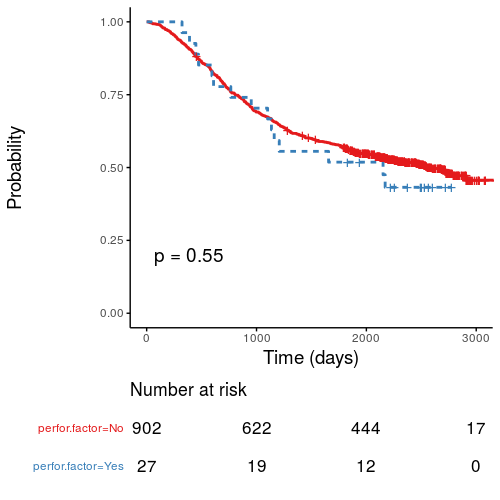
Kaplan-Meier survival plots
KM plots can be produced using the library(survminer)
# KM plot
explanatory = c("perfor.factor")
dependent = "Surv(time, status)"
colon_s %>%
  surv_plot(dependent, explanatory,
  xlab="Time (days)", pval=TRUE, legend="none")
Notes
Use Hmisc::label() to assign labels to variables for tables and plots.
label(colon_s$age.factor) = "Age (years)"
Export dataframe tables directly or to R Markdown knitr::kable().
Note wrapper summary_missing() is also useful. Wraps mice::md.pattern.
colon_s %>%
  summary_missing(dependent, explanatory)
Development will be on-going, but any input appreciated.


